Me, Nigel the Starter, and our relationship advisors

I know, it’s cutesy, but after a year and a half I’ve decided my sourdough starter (based on Dan Lepard’s recipe in The Handmade Loaf), needed a name. Nigel has a personality of its own (yes, still an it, as its yeast and bacterial cells are genderless): fragrant and sometimes a bit sluggish, but it always provides a tasty loaf, even if I stray too far from advice and slap something together experiment.

My relationship with Nigel has also been assisted expertly with the support in real time of Dan, Azelia and Joanna, among others. They’ve helped me think about flours and other ingredients, proving, shaping, and slashing, about how to swaddle the dough in warm weather so that it doesn’t lose the will to grow strongly, and how to fit bread-baking in with my life rather than let it take the reins. They’ve provided fabulous examples for me to emulate. And most of all they’ve kept me from being discouraged by the mistaken belief that I simply lack the chops to make beautiful, delicious bread. Lots of other folks, too, provide encouraging oohs, aahs, RTs and Likes when I send pics around on Twitter and Facebook, and my husband Andrew happily eats everything that comes out of the oven.

Nigel has expressed interest in travelling and its offspring have flown as far as Tilburg, The Netherlands, where they’ve set up housekeeping with future celebrity chef Luc. It’s possible it’s now travelled as far as Toronto; I’m waiting for an update from one of its guardians.

It turns out baking is not so much about chops, at least in any inherited sense; it’s about passion, persistence, luck (occasionally) and knowledge. See? I can do this! (After the pics, I’ll share my recipe.)

20120130-103807.jpg

20120130-104037.jpg

20120130-104304.jpg

This recipe combines features of two others that I love: Dan Lepard’s Crusty Potato Bread from The Handmade Loaf, and Pain de Campagne from William Alexander’s 52 Loaves (a terrific read about the quest for the perfect sourdough loaf). The key elements are, from Dan’s, honey and some grated potato, as well as Dan’s standard kneading-and-resting method, and from the other, mostly strong white flour with a bit of wholemeal and rye, and a smidge of yeast. Flour geeks: would you believe the spring these got from Hovis extra-strong *British* flour? I had no idea!

My only regret with the loaves above was that after shaping I refrigerated them on baking paper atop a baking sheet (I must’ve been thinking of bagels) and the baking paper stuck. Fortunately I was able to scrape the dough off the paper without deflating it, and dough held its shape for the rise, but with a wetter dough it would’ve been a huge mess. Next time, I’ll go back to the tried-and-true floured-cloth-in-a-bowl-or-basket method.

Sourdough Peasant Bread

200 g levain at about 90% hydration
1 1/2 tbsp honey
290 ml room-temperature water
400 g strong white flour
60 g wholemeal bread flour
30 g rye flour
1 1/2 tsp salt
1/4 tsp yeast
small potato, scrubbed but not peeled, grated

Mix starter and honey in water. Weigh and combine flours, salt, and dry yeast. Add water-starter mix to flour and combine well, turning the mass onto a clean work surface if necessary to incorporate all the flour. Cover and set a timer for 10 min while you tidy up the kitchen or check Twitter. Knead/fold for 10-12 sec. Repeat 3 times.

Shape the (now smoother) mass into a ball and put in a lightly oiled bowl; cover with cling film. At this stage you can either leave it in a 20-25ºC kitchen until it’s grown in volume by about half, or put it in the fridge for longer.

Divide the bulk-proven dough into two halves and shape it. For this recipe my shapes approximated a batard and a slightly-off boule. Rub rye flour into a linen cloth to line a basket or bowl, and put the shaped dough in seam-side-up. Wrap loosely with cling film. Again, you can prove in the fridge overnight, or leave at room temperature for a couple of hours.

Preheat oven to 200ºC, for about 45 min if you are using a bread stone of some kind. Dust with flour, then slash with a sharp, cerrated knife to about 1 cm in depth. Bake until well-browned, about 40 min.

4 Comments

Filed under bread, recipe

Wholemeal Bread

For my first Short and Tweet effort I’m afraid I’m not breaking new ground. In fact, it’s not even that much of an effort as this is our regular loaf, and a fairly easy one at that. So I’m being a a bit lazy here. However, I will say that it’s a cracker – no it isn’t, it’s a bread! arf. – and it’s the loaf that decisively ended our Hovis habit. And when I’m busy/not in the mood/wanting to feel less of a hausfrau, the man of the house, who loves to eat but is not baking-obsessed, feels confident enough to make it without having to fear my control demons coming after him. Result!

So these pics are of a loaf we made together; I started and rose and shaped the dough, he floured, slashed and whacked it in the oven. Detail-wise, the recipe I use is actually Felicity Cloake’s ‘Perfect’ adaptation, which has about 15% white flour, and the knead timings are different to Dan’s book. Either way, it’s a great, pretty-much-unscrewuppable loaf.

Update: The collected results are in; check everyone’s loaves at the Short and Tweet site.

7 Comments

Filed under baking, bread, cooking, food

Rugel-what?

All raspberry to the right, raspberry plus chocolate and nuts on the left.

Rugelach. The ‘ach’ is as in ‘Bach’, though the a is a bit shorter. Anyway, not ‘atch’ as in ‘batch’. Challah is another word pronounced with the slightly gutturalized ‘h’ sound, as opposed to ‘ch’ as in ‘chips’, but challah is from Hebrew while rugelach is from Yiddish and…

Oh, sorry, I got distracted there; what is a rugelach? It’s a sweet, a biscuit, a cookie, of Eastern-European Jewish origin. A rugelach is rolled like a wee croissant; it’s a rich dough – often based on cream cheese and butter – filled with all the sweet stuff you can find: jam, chocolate, sugar, dried fruit, cinnamon, some nuts maybe, with a bit more sugar sprinkled on top, just to make sure. The dough itself is not very sweet, though, so it balances the fillings.

This recipe is from Dorie Greenspan, with minor changes; I’ve adapted the measurements for the UK, but the original, with US measurements, can be found here. It’s also in her book Baking: From My Home to Yours.She also includes currants, but when rolling mine up I found there was already plenty of stuff in there for the tiny cookies to hold.

Traditional Rugelach

Dough

115 g cream cheese, cold, in chunks

115 g unsalted butter, cold, in chunks

125 g plain flour

1/4 tsp salt

Glaze

1 large egg

1 tsp cold water

2 Tbsp coarse white sugar

Filling

225 g raspberry jam, apricot jam or marmalade. (I recommend a low-sugar, high-fruit style of jam or preserves.)

2 Tbsp caster sugar

1/2 tsp ground cinnamon

50 g chopped nuts: walnuts are traditional, but pecans or almonds are also fine

115 g 80% dark chocolate, finely chopped

Makes 32 small cookies.

TO MAKE THE DOUGH: Let the cream cheese and butter rest on the counter for 10 minutes — you want them to be slightly softened but still cool.

Put the flour and salt in a food processor, add the chunks of cream cheese and butter and pulse the machine 6 to 10 times. Then process, scraping down the sides of the bowl often, just until the dough forms large clumps, not until it forms a ball on the blade. It should, though, stick together when you squeeze it.

Turn the dough out, gather it into a ball and divide it into two approximately equal balls. Flatten each ball into a disk, wrap them in cling film and chill in the fridge for at least 2 hours, or up to 1 day. (Wrapped airtight, the dough can also be frozen for longer periods.)

TO MAKE THE FILLING: Heat the jam in a saucepan over low heat, or do this in a microwave, until it melts. In a separate bowl, mix the sugar and cinnamon together.

Line two baking sheets with parchment or silicone mats.

TO ROLL THE RUGELACH (this is the fun bit): Pull one dough disk from the fridge. If it is too firm to roll easily, give it a few bashes with your rolling pin, but don’t be afraid to lean on it.

On a lightly floured surface, roll the dough into an 11- to 12-inch circle; the dough will be about 1/8″ thick. Brush a *thin* gloss of jam over the dough – too much and it will leak out and burn or get stick-to-your-teeth chewy – and sprinkle over half of the cinnamon sugar. Scatter over half of the nuts and half of the chopped chocolate. Cover the filling with a piece of wax paper and gently press the filling into the dough, then remove the paper and save it for the next batch. This will help keep the chopped nuts from getting lost.

*This is a good time to preheat the oven to 175°C .*

Using a pizza wheel or a sharp knife, cut the dough into 16 wedges, or triangles. (The easiest way to do this is to cut the dough into quarters, then to cut each quarter into 4 triangles.) *Starting at the base of each triangle*, roll the dough up into a crescent. Arrange the rolls on a baking sheet, making sure the points are underneath the cookies, and refrigerate. Repeat the steps above with the second disk of dough, and refrigerate the cookies for at least 30 minutes before baking.

TO GLAZE: Stir the egg and water together, and brush a bit over each crescent. Sprinkle with coarse sugar.

Bake the rugelach for 20 to 25 minutes, rotating the baking sheets if necessary, until cookies are puffed and golden. Transfer the cookies to cooling racks and cool to room temperature.

STORING: You may want to use sheets of baking parchment or grease-proof paper between layers of rugelach in a tin or in the freezer to prevent them sticking together and breaking. They can be kept covered at room temperature for up to 3 days. or wrapped airtight and frozen for up to 2 months.

7 Comments

Filed under baking, biscuits, cookies, Jewish, recipe

Sometimes all the stars align

Yesterday afternoon, after shaping a batch of bagels in the morning, I had a good amount of revived starter left over, with a bit of rye flour thrown in for flavour and colour. After 30 hours out of the fridge it was looking even more boisterous, full of those gluten strings, and just asking to be made into a loaf of bread.

I hadn’t made anything yet from Dan Lepard’s Short and Sweet, and I’d noticed that Dan had included a few pages on sourdough, so I checked to see whether were any new recipes. There weren’t recipes per sé, but there was something better: encouragement to experiment. He suggested adding leaven to the Easy White Bread recipe and reducing the amount of water. I did that, tweaking a bit further with a tablespoon of honey and substituting 50 grams of spelt flour for strong white (Waitrose Canadian). After the usual knead/rest cycles, I let the ball of dough rise for a few hours, then just before bed I then shaped it into a batard per the method in The Handmade Loaf. Calling on my friend Joanna’s guidance, which she may not even remember offering, I left the shape for 10 minutes and then came back and did it over, managing to get tapered ends.

But would the shape hold up after proofing? I swaddled the dough in floured baking parchment and a tea towel, tucking it diagonally into a small roasting tin (that would fit in the fridge) with more folded tea towels in the other corners to support it, and then left it to chill overnight. In the morning, the unwrapped loaf from the fridge was still nicely proportioned and in no danger of slopping out to the sides. I whacked the oven on, putting in my trusty pastry and dough-shaping marble slab; it had never occurred to me that it would be a good baking stone after I banished my el cheapo pizza stone to the garden. I probably should’ve decided how long it needed to heat up and stuck to it, but I couldn’t wait; I think it was 25 minutes, or at least the time it took to eat cereal, read the front section of yesterday’s paper, and drink half a cup of coffee. I made two overlapping, slightly angled, 1/4″ slashes as for a baguette – again per Joanna’s guidance – with a sharp serrated knife as I can’t get lames and razor blades to work for me, sprayed the top of the loaf with water, and slid it on to the hot stone. Ten minutes in I regretted forgetting to sprinkle flour on top, but in the end I don’t think it matters.

Et voilà!

Above is the crumb. I left it a bit on the moist (but done) side, and then learned today from my friend Azelia‘s blog that in this state it can soften the crust – which it did. It’s fine, though: chewy.

Azelia also asked, today, what we like about sourdough. I like the solid, substantial texture it seems to have, and it would be ridiculous for me to speculate why that is, though I suspect one or more of my baking buddies can. And it just tastes good, though ‘sourdough’ is really, often, a misnomer. Sure, the sourdough they sell to tourists in the San Francisco airport is distinctly (to me, unpleasantly) tangy, but what I usually make from my starter, whatever the bread recipe, just tastes mouthfilling (how vague is that?) and holds up to a number of sandwich ingredients or spreads, and also toasts well.

7 Comments

Filed under baking, bread, cooking, how to, sourdough

Free food from nature: Apple-cheddar pie

The house we rent has the most miraculous apple tree. Last year, we harvested buckets and buckets of huge red-green apples. They grew so tightly on the branch that, in removing one, three or four more would fall to the ground. There were too many even for the worms to keep up with. At the end of the harvest, though, the gardener came by and pollarded its branches back to the quick and, I’m sorry to say, this year there were no apples. I’ve been obsessively monitoring and scavenging other peoples, and finding ways to use any and all that come to me so as not to waste the resource (although I understand that returning to the soil and providing food for animals are also legitimate uses of the resource). It helps that it’s the Jewish New Year, for which, at least in the Eastern European tradition, eating apples is auspicious for a round and sweet year to come. And I enjoy the English pride in local heirloom apple varieties, similar to what I grew up with in the northeastern US, and with some overlap – but I’ve barely begun to scratch the surface of tasting all the colorfully named fruits.

One of my favourite ways to eat apples is with sharp cheddar. I’d be happy to make a daily habit of lunch consisting of alternating slices of apple and cheese. But variety is good, too, and baked goods are another perfectly good way to eat up a glut (whatever that is) of apples and, if you’re so lucky, cheese. Hence this pie, based on Williams-Sonoma’s recipe. I like to use a good Canadian or Welsh cheddar as many of the cheaper English varieties have a certain flavour-note that I don’t get on with. Fortunately my mother-in-law’s tree was heaving with apples this year, so when we brought her back to Cambridge – with a bucketful – it seemed like a good opportunity to try the recipe which, while a bit long and fiddly, benefits from the detail.

With its crisp, flaky, cheesy crust and melting apples, this pie did not last long.

Apple-cheddar pie

Ingredients:
For the dough:
315 g (2.5 cups) plain (all-purpose) flour
2 tsp salt
1 Tbs sugar
170 g sharp cheddar cheese, finely grated
225 g (2 sticks) frozen unsalted butter, cut
 into 1/2-inch dice
75 to 120 ml (1/3 to 1/2 cup) ice water
For the filling:
1.75 kg (3.5 lbs) cooking apples, peeled, cored and cut
 into slices 1/4 inch thick
1 1/2 lb. Granny Smith apples, peeled, cored 
 and cut into slices 1/4 inch thick
3/4 cup sugar
1 Tbsp fresh lemon juice
3/4 tsp ground cinnamon
1/4 tsp nutmeg
1/4 tsp salt
1 Tbsp unsalted butter
3 Tbsp cornstarch
2 Tbsp cream

Directions:
Dough:
In the food processor bowl – without processing, yet – add the flour, salt, sugar and cheddar, breaking apart any large clumps of cheese. Put the diced butter on top and put bowl in the freezer for 10 min.

When the mixture is chilled, return the bowl to the machine and pulse until combined, about 25 to 30 pulses. Add 1/3 cup of the ice water and pulse twice. The dough should hold together when squeezed with your fingers. If it is crumbly, add 1 Tbsp more water at a time, pulsing twice after each. Divide dough in half and shape each half into a disk. Wrap the disks separately in cling film and refrigerate for a good hour or more; the dough is much easier to work with if quite cold.

Filling:
While preparing your apples, have lemon juice ready in the bottom of a large bowl, and toss the slices in the lemon juice as you go along. Add sugar, cinnamon, nutmeg and salt, and stir to combine. Let stand at room temperature for 30 minutes to 1 hour.

Rolling out the bottom crust:
While the apples etc. are macerating, remove one dough disk from the refrigerator. Flour a smooth work surface. Peel back the cling film partway, and place dough on the work surface. With the cling film on top, roll the dough into a 12-inch round about 3/16 inch thick, evening out by hand any uneven edges. Scraping it up if you need to, drape the rolled-out dough onto your rolling pin; transfer it to an ungreased pie dish and press into the dish Trim the edges if needed to leave a 1/2-inch overhang. Cover with plastic wrap and chill for 30 minutes.

Preheat oven to 200°C (400°F).

Filling, continued:

Reduce the apple/lemon juice as follows, to produce a glaze for the apples: Remove the juice by draining apples through a sieve over a small saucepan, then transfer the apples to a large bowl. Heat the juices over medium-high, add 1 Tbsp butter and cook until reduced to 1/3 cup, 3 to 5 minutes, then remove from heat. Sprinkle the cornstarch over the apples and toss to combine, then stir in the reduced juices. Transfer apples with juice to the pie shell.

Rolling out the top crust:
As above, roll out the remaining dough disk into a 12-inch round about 3/16 inch thick. Drape the dough over the apples and press gently to eliminate air pockets. Trim the dough flush with the rim of the dish. Fold the bottom crust over the top crust and squidge the top and bottom together as decoratively as you’d like; I did it with my fingers. Cut slits in the top of the crust to allow steam to escape. Brush the top of the crust with the cream.

Bake for 20 minutes at 200°C. Cover the edges and top with aluminum foil if they begin to get too dark. Reduce the oven temperature to 175°C and continue to bake until the apples are easily pierced with a knife and crust is nicely browned, 65 to 70 minutes more. Transfer to a wire rack and let cool for at least 1 1/2 hours before serving, or eat warm, with poured cream or vanilla ice cream.

4 Comments

Filed under baking, cooking, food, recipe, Uncategorized

How to make a falafel dinner

RYMFB4ZQPTT6 Falafel, in the Middle East, is a stealth vegetarian meal. Everyone likes it (at least, everyone I’ve met), it’s the perfect street food, it’s so tasty that no one misses the meat, and it’s a great way to get extra vegetables into your diet.

There’s an ongoing argument about the provenance of falafel – a fried, seasoned ball of ground chickpeas – and who owns the original idea, but it’s a basic staple of the eastern Mediterranean. Some of the best falafel is found in grittier areas of Tel Aviv and Jerusalem. The concept is thus: you order a whole or a half sandwich, and choose from toppings to stuff precariously into your pita. Those toppings include a rainbow of shredded or chopped salads, fried eggplant, chips (in the British sense), tahini sauce, and a super-hot Yemeni condiment called zhug, which I think you have to be Yemeni to pronounce correctly.

Oh, the memories. No, I won’t tell you how old those memories are, but I did live in Israel for 10 months in my early 20s so you can do the math if you have the right additional info.

The international chain Maoz, now in big cities in Europe and North America, is very, very good, but it’s fun and possible to have a real falafel experience at home, from scratch. (That said, I tried making falafel recently when I was cooking for myself – I’ve done it before, I swear – and dangit! they fell apart. It is a bit of a stretch to try and nail fresh pita bread AND fresh falafel AND two or three toppings by one’s self in a few hours. The pics are from a more relaxed and successful attempt.)

Here are the elements:

Tahini sauce – tahini from a jar (the Lebanese kind is best), thinned with water and lemon juice and with some chopped garlic mixed in, like hummous without the chickpeas
‘Israeli salad’ – simply chopped cucumbers and tomatoes
Pitta or pita bread – Worth making yourself, I swear, and surprisingly easy. Try this recipe if you’re used to working with cup measurements, and this one if you prefer weights and have a gram scale; I’ve had good success with both. Whether or not you make them in advance, wrap them in a towel as they come out of the oven to keep them soft.
Chips or french fries – not a requirement, but I love them, and they are a traditional falafel stuffing in Israel
Falafel – ah. Here’s where I have to be a bit bashful and confess that I tend to use a mix, as falafel made thus are quick, tasty, and reliable. I promise that I will continue to work toward my own recipe for falafel from scratch. Watch this space! Update: Here is a post from Zeb Bakes full of super-useful tips on rolling your own, from dried fava beans. I think that means I’m next!
Zhug – it really does help set off the flavours to include something spicy. Here is a legit one from The Atlantic so as to avoid linking to one out there that seems to have been ripped off without permission.
Eggplant – thin, fried (or oven fried) slices are a very nice addition.

You can also look around for vinegary pickled cucumbers or other vegetables, and maybe throw together a salad of shredded carrots or beets.

Enjoy and let us know how it goes!

RYMFB4ZQPTT6

10 Comments

Filed under baking, cooking, dinner, food, how to, Israel, Jewish, vegan, vegetarian

Our own potatoes! And…?

Our first batch of King Edward potatoes seemed to be reaching the end of their growing season, so I thought I’d dig some, and ask Mr Veggie Box to bring us extra mushrooms this week in place of a portion of potatoes too far. Scrabbling blindly around in the dirt, my fingers pulled up something that was the right size and shape…but turned out to be green. Not sickly, aged-potato, solanine green, either, but proper lime-green. I think I can guess what it is and how it got there (I haven’t cut it open yet). Your thoughts?

7 Comments

Filed under food, gardening

Semolina bread with sesame seeds

Fridge-retarded, fan oven-baked second loaf.

I first had a semolina flour-based bread encrusted with sesame seeds when I lived in Chapel Hill, NC, in the early ’90s, from a store soon bought by Whole Foods called Wellspring Grocery. (The less said about my feelings about Whole Foods the better.) Fast forward to 2007, to the New York Times/Bittman/Lahey no-knead bread craze, as a result of which I realized I could make decent bread after a lifetime of thinking I merely hadn’t inherited a gene for it. Not only was my bread decent, I found I could play around with the flours and the coatings and still succeed; sesame-semolina (the link takes you to my old, inactive food blog) was my first creative triumph with this loaf. It had a crisp yet tender crust, and a moist, tasty crumb.

And now, another 4 years later, Joanna of Zeb Bakes lays her hands on some proper Italian flour with a lovely name, semola di grano duro rimacinata – finely ground durum semolina flour, grabs a levain-based semolina bread recipe from Jeffrey Hamelman’s Bread, and produces the gorgeous loaf (as well as terrific ciabatta!) that you can see here.

As the kids say, I am so there. Forgive my crappy pics, and the fact that I cut into the loaf with a substandard knife, before it was completely cool. Joanna’s loaf has a nice, crusty ear to the slashes that mine didn’t, and while mine was rounded on the bottom, I wouldn’t say it had optimum spring. I think I have to blame this – again – on my thin <1 cm) pizza stone, which I swear stays at a lower temp than the rest of the oven; I get springier and more evenly cooked bread and pizza on an M&S nonstick tin. Tonight, I’m simply removing the damn thing. Anyway, the pics:

I should’ve taken a pic of the shaping and how I got the seeds on, but let’s see if I can describe it. After the bulk prove, I made a tight boule shape with the dough (half of it, putting aside the rest for another loaf). I spread out a tea towel on a baking sheet and sprinkled a generous, even layer of sesame seeds on it. Then I picked up the boule, cupping the bottom or seam side in my hand, and rolled the smooth, top side of the boule around on the seeds. I gathered up the boule and seeds in the tea towel and plopped the whole thing in a medium-sized mixing bowl, sprinkling and pressing more seeds around the seam side (still facing up). I left the whole thing in the bowl to prove, and covered the bowl with cling film.

We enjoyed half of the loaf with some spicy Moroccan vegetable stew with Merguez sausage; the bread was a nice change from couscous, which we never seem to finish.

The loaves above proved 2 hours. I have left the somewhat larger portion to prove overnight in the fridge, and I’ll bake that tomorrow morning; it’s intended for some friends we’re visiting over the weekend.

8 Comments

Filed under baking, bread, sourdough

Bagels, part 2

We’re getting close now. This recipe is worth trying, and making your own. Made with very strong flour and less water, they’re chewier inside, retaining a crispy crust when fresh. Relative to my earlier recipe, based on that of Jo Goldenberg of Paris, these are less sweet. I also tried malt syrup in the dough as well as in the water, and didn’t like the colour or flavour. So, plain old table sugar it is. In addition, these bagels need less yeast because they rise in the fridge overnight once shaped. This makes them easier to manage in the boiling process, and a slow ferment is always good for flavour.

And more on upping the chewy-factor: Normally, for pretty much any yeast bread, I use the Dan Lepard approach to kneading, i.e. 10 seconds of kneading followed by 10 seconds of rest, in three cycles. In this case, however, continuous, serious kneading seems to be necessary to maximize the gluten, possibly, too, because the dough is drier. So it’s a good recipe to make if you enjoy getting your back into it, as well as, eventually, your teeth.

Finally, it has some sourdough starter in it, mostly for taste, so it doesn’t have to be terribly active. My starter began with a couple of tablespoons of yoghurt for the bacteria. Whether or not that makes my bagels dairy, after many generations with no further yoghurt added, is a question for the rabbis, but there are perfectly good starters with no yoghurt in their history, too.

New York/Boston-style Bagels

450 g very strong white flour
150 g active sourdough starter
250 ml warm water
1/2 tsp dry yeast
2 Tbsp honey (or sugar)
2 tsp salt
1 Tbsp malt syrup (or sugar, or treacle) for boiling
½ tsp bicarbonate of soda
1 egg white+1 Tbsp water for glaze

Toppings: poppy and sesame are most traditional; nigella, caraway seeds, onion or garlic bits and sea salt are other possibilities – or all of the above: the Everything Bagel.

Combine flour with dry yeast, sugar and salt; stir with a fork. Dissolve starter in warm water and add to flour mixture. Stir till combined and let rest for 10 minutes.

Turn dough out onto smooth surface and knead vigorously for 10 minutes. Dough should be on the dry side at this point. When dough is very smooth and springy, put it in a lightly greased bowl, cover and let rise until doubled in volume.

Divide risen dough into 8 or 10 equally sized pieces and form into tight ball shapes. Let these rest for 10 minutes, then form your bagels thus:

–       Roll a ball into a snake shape about 6 inches long, its ends somewhat tapered.
–       Wrap the middle of the snake around the tops of your fingers and pull and pinch the ends together between your thumb and fingers.
–       With the bagel still wrapped around your fingers, roll the joined bit back and forth on your work surface to seal the join.

Put the formed bagels on baking paper (parchment) on a baking sheet with at least half an inch between them. Cover securely but not tightly with cling film (plastic wrap) and refrigerate overnight.

In the morning, preheat oven to 210°C. Take the bagels out of the fridge and let them rest while you get set up for boiling, decorating and baking. They don’t have to be completely warmed up to be boiled, however. Now is a good time to mix your egg/water glaze and set up your seed toppings.

Set a medium-to-large pan to boiling. Add sweetener and bicarb. Once the water boils, turn it down until the surface is just barely moving. Add 2 or 3 bagels to the water, flip them after about half a minute, and continue to simmer for half a minute more. Scoop out and remove to a clean tea towel. Be gentle, as they will be quite soft at this point; a big slotted spoon is good for this task.

Brush the boiled bagels with egg glaze and sprinkle with seeds to taste.

Bake for about 25 minutes in the middle of the oven. About halfway through baking, flip the bagels over to prevent excessive flattening of one side.

Update: My friend Azélia gave me a hint on the sweetener: apparently honey improves the texture of the dough, and it seemed to be the case the last time I tried the recipe substituting it for sugar. They came out smoother and shinier. Malt syrup, used in some traditional recipes, apparently has the same function, but I found it gave the bagels a misleading brownish colour given that they were actually made with white flour, and anyway honey is something most people are more likely to have around the house.

1 Comment

Filed under bread, Jewish, recipe, sourdough

A mini-honeymoon in Amsterdam

I always thought that a proper honeymoon was supposed to involve beaches and sleeping in a lot. But then I also thought that weddings were supposed to involve big, white dresses, ice sculptures of swans, and family rows, and I knew we weren’t having any of that either, so why sign up for a stereotypical honeymoon? Amsterdam seemed interesting, was quick to fly to, and neither of us had been there – oh, and it was possible we might find something good to eat, even if it was just classic Old World bread and cheese. So, done.

As it turned out there was plenty of good stuff to eat. The Time Out guidebook offered an enticing hint: that there were substantial snacks to be had, so that you wouldn’t starve between meals. One dilemma was that I have really been trying to lose a bit of weight. One the one hand we were on holiday so a bit of indulgence seemed OK, but on the other I did find myself making mental notes of calories consumed versus hours walked. And walk we did, until our feet hurt, although lot of that walking involved tracking down recommended food stops. Well, that is who I am.

Houses on the edge of the Vondelpark. You know you want to live there.

Tuesday evening, after getting settled in our hotel and having a quick wander in the Vondelpark, we hopped a tram to the Pijp, where efforts at upward mobility clashed gently with bohemian coffeehouse and immigrant cultures. This was evident in stoned graffiti on building-site plywood – for example, “A city sodomized by tentacles of distrust” – across from a pedestrian-only block filled with a variety of relaxed natives and tourists scattered amongst sidewalk cafés. Here, we learned our first bit of food-Dutch: Vlaamse friet, or Belgian (Flemish) fries, on offer alongside falafel. Yes, please. The menu had a bit of Hebrew on it, so I asked the guy in front of us if it was an Israeli shop; he told us most of the falafel shops in Amsterdam were run by Indians and, sure enough, some of the salads in the falafel bar had a touch of cumin and coriander seed, not what you’d find in Tel Aviv. Good though. More difficult to figure out was the long list of friet toppings; I picked the one that seemed most likely to be mayo, and it was. A satisfying snack indeed; we never got around to dinner that night, but after much walking we did succumb in the hotel bar to a (bad) slice of ‘New York’ cheesecake, which they seemed a bit too eager to get rid of.

Typical shop in the Pijp.

Breakfast was not included in our hotel package, for which I was thankful; I tend to eat too much mediocre food, just because it’s there, blowing my calories much too early in the day. We noted a cheese shop near to the hotel with an offer of belegte broodje met koffie, filled rolls and coffee. What more do you need, really? I chickened out and ordered in English, though, too scared of making a mistake. The choices were old, young and mild cheese; we got a young and an old, and I’m afraid I didn’t write down the names. The coffee, by the way, although obviously not the focus of the shop, was spot on, as would be each of the subsequent cups we drank in Amsterdam. How do they do that?

We had a good chunk of time that morning to explore the city centre, the Dam (main square), the red light district (how could I not? I’m a public health professional after all) and the Oude Kerk, the old church – right smack in the middle of the red light district, and there’s even a statue of a sex worker on the grounds. A classy little bakery with pretty sweets and really good bread was a few steps away, and we stopped in for an almond-curl biscuit, amandelkrull – I got an approving nod from the baker for sounding out the word correctly. Result! OK, that was an easy one. How about koekje? Am I right in guessing that this should be pronounced, approximately, ‘cookie’? We didn’t spend as much time in patisseries scrutinising the koekjes as we should have. Given that each cup of coffee was accompanied by a different one, I suspect that there is a whole new world out there. Anyway, here’s a pic of the window of the bakery in the red-light district:

Let's call it Munchies Bakery, since I can't remember what it was really called.

While we shared our amandelkrull and drank coffee, a young American guy came in. The proprietor threw a wry, knowing (but not unkind) glance to his assistant that said ‘You want to take this one?’ American guy proceeded to order, rather passionately, a brownie and a slice of carrot cake, at 11 am. It seems the many cannabis coffeeshops in the area are good for business.

That afternoon, after a light, leisurely lunch back in the Vondelpark – it’s so easy to get around! – with a friend and her lovely twin babbies, we braved threatening skies and headed over to the Jewish History Museum. We walked via the somewhat disappointing flower market – mostly tourist souvenirs, at this point, and to be honest (eek, don’t hate me!) I don’t even like tulips all that much. But if I lived there, I might pick up a few perennials. Amazingly, though cannabis seeds were on sale everywhere, I don’t believe I saw any growing, anywhere. (Perhaps it’s grown indoors? I ask purely out of theoretical interest, honest.)

One thing we knew we wanted to try in Amsterdam was Indonesian food, which seems to take the place of Britain’s Indian restaurants, since Indonesia was for a long time a Dutch colony. Our friend referred us to Orient, a family-run business near the famous Concertgebouw and the big art museums. Wednesday was buffet night, which made it easy to try many dishes – the equivalent of a rijstaffel? I managed not to overeat, but I could have done quite happily.

Bloemenmarkt

We shared a fabulously buttery almond croissant, nabbed earlier in the day, on the way back to the hotel. Perfect.

Thursday morning rained buckets on Amsterdam, so it was a good day to hit the museums, but first, breakfast. We had to try Bagels and Beans, if only because it looked like an inviting place for a sit-down. The menu was great, the coffee was again lovely, and some American students were happy to share the shop’s wifi password with us. The only disappointment with the breakfast was, I’m afraid, with the bagels themselves. They lacked that boiled, chewy quality and were somehow a bit crumbly.

Never mind; we survived, and were fed, and braved the queues for the Rijksmuseum. Delftware, check; Old Masters, check (except for the Vermeers, which were in The Hague); celebration of faded imperial glory, check. Truly, though, we love old Rembrandt – he’s a Master for good reason – and it was exciting to experience his work in person.

For lunch Thursday we wandered around the canals in search of a recommended sandwich shop. The wander was worthwhile in itself, but when we got to the shop, there was truly nothing on the long, mostly meat menu I really wanted, and the bread was only just meh.

A Delft violin, with strings and all. I can only imagine it sounds pretty weird.

Andrew bought one and I abstemiously settled on tangy frozen yogurt with berries, in preparation for the inevitable afternoon attack of the friet. We sneakily borrowed a seat outside the yogurt shop where I made myself available to help Andrew consume the biggest, sloppiest sandwich we’d ever seen, a takeaway item that really should have come with its own table, plate, cutlery and napkins.

Which brings me to the topic of mayonnaise. I love the stuff, but not as much as the Dutch do. It’s everywhere! The supermarket deli/ready-meal section we visited had shelves and shelves of mostly mayo salads and sandwiches. As noted above it’s the default topping for friet. Where do they put it all? Why are Amsterdammers not fat? I can only assume it’s because they cycle everywhere.

I found something better than mayo, or even ketchup (another Indonesian word!), for friet. After circling back around to the Portuguese synagogue, which we hadn’t fit in the day before, I did indeed get drawn in by the ubiquitous friet. This time, though, on a hunch, I asked if one of the sauces on offer was peanut-flavoured and, sure enough, I got satay, a rich, dark, sweetish, slightly spicy sauce that was better than those particular friet to be honest.

I wish I’d gotten a larger portion, but it was just as well I didn’t, as dinner – tapas, at Sal Gorda, not far from our hotel – was very filling indeed (the restaurant is much prettier than the website). And even though my Dutch is nonexistent, our lovely waiter was only too happy to speak Spanish! We had the classics here: marinated anchovies, Merguez sausage, a big bowl of olives, patatas bravas (with more mayo, natch), shrimp in garlic sauce, and more. As it was still light, I forgot it was 9 pm and ordered a cappuccino (just to go wash down the crema Catalana of course); amazingly, it didn’t keep me awake.

Friday morning – our last morning – was again rainy, and we breakfasted at Le Pain Quotidien, a Belgian chain that’s really very good, though I did find myself wondering if there was a seamy underbelly. They sell beautiful sourdough loaves, but when I asked the waiter if he’d had a chance to make them, he admitted that the loaves are prepared and shaped elsewhere, and only baked in the local shop. Fair enough…I suppose. It is a chain after all.

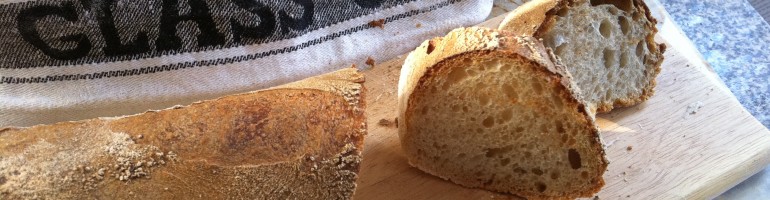
We weren’t sure these were the loaves we wanted to bring home, though, so we poked our heads in a few shops in this (very posh) neighbourhood and ended up in an organic grocery, where we bought a sourdough nut loaf and some young geitekaas (goats’ cheese), having previously bought some aged geitekaas, quite different, at a shop in town. And with our last few euros – luckily they didn’t take credit cards as we could’ve done some serious damage here – we bought some fruit jellies for Andrew’s mum, in the most beautiful sweet shop you’ve ever seen, Van Avezaath-Beune.

Café at Schiphol Airport. These wooden loaves looked better than the actual bread, unfortunately, but they had good coffee and free mini-stroopwaffels.

Amsterdam, we love you and will be back, armed with a better knowledge of Dutch… there is so much more to eat!

10 Comments

Filed under Amsterdam, bread, food, travel